Cooking knives by Nick Wheeler
- Chef’s knife/Cook’s knife
- Paring knife
- Serrated slicer/Bread knife
- Boning knife
- Carving knife
- Fish slicer/Filleting knife
- Serrated knife, small/Tomato knife/Citrus knife
- Scissors/Kitchen shears
- Steel
- Peeler
- Carving fork
- Pastry Cutters
- Larding needle
- Mandoline
- Mezzaluna
- Pastry wheel/Pasta wheel
- Pizza cutter
- Ravioli cutter/Ravioli stamp/Ravioli press
- Truffle slicer
- Cheese grater
- Grater
- Nutmeg grater
- Apple corer
- Cherry stoner
- Melon baller
- Pepper grinder/Pepper mill
- Cutlet bat
- Food mill
- Masher
- Mortar and Pestle
- Potato ricer
HAND TOOLS
KNIVES, STEEL, AND CUTTERS
Knives
Best for: Slicing, chopping, paring, peeling, boning, carving, mincing, and filleting
How to buy:
Materials: I have knives with blades made from high-carbon stainless steel, carbon steel, and ceramic. Each metal has benefits and drawbacks which make them better suited for particular tasks.
Stainless steel is rust-resistant and does not react with food. The type of steel used will affect how sharp an edge can be maintained between sharpening. Stainless steel is more difficult to get razor-sharp than carbon steel but it will hold its edge longer.
Carbon steel is cheaper than stainless steel and sharpens better. The disadvantage is that carbon steel corrodes and stains as it interacts with some food. The blade will not keep its edge as long as stainless steel blades. The metal can also break if put under excessive stress, e.g. twisting or bending. Carbon steel knives require more care as they must be kept dry and coated with a thin layer of oil. If they become stained they can be cleaned with a scourer and an abrasive cleansing cream.
High-carbon stainless steel is a combination of stainless steel and carbon steel, and it makes a very high-quality blade. The high carbon content makes it easier to get a razor-sharp edge while the stainless steel gives the blade the strength to maintain the edge. It will have a sharper edge than normal stainless steel.
Ceramic keeps a razor-sharp edge for years with no need to sharpen. The knives are light and strong but are brittle so they can break or chip if dropped or used to cut something hard like bone or frozen meat. Ceramic does not react with food or corrode, but the knives need to be stored in their own box so they do not break.
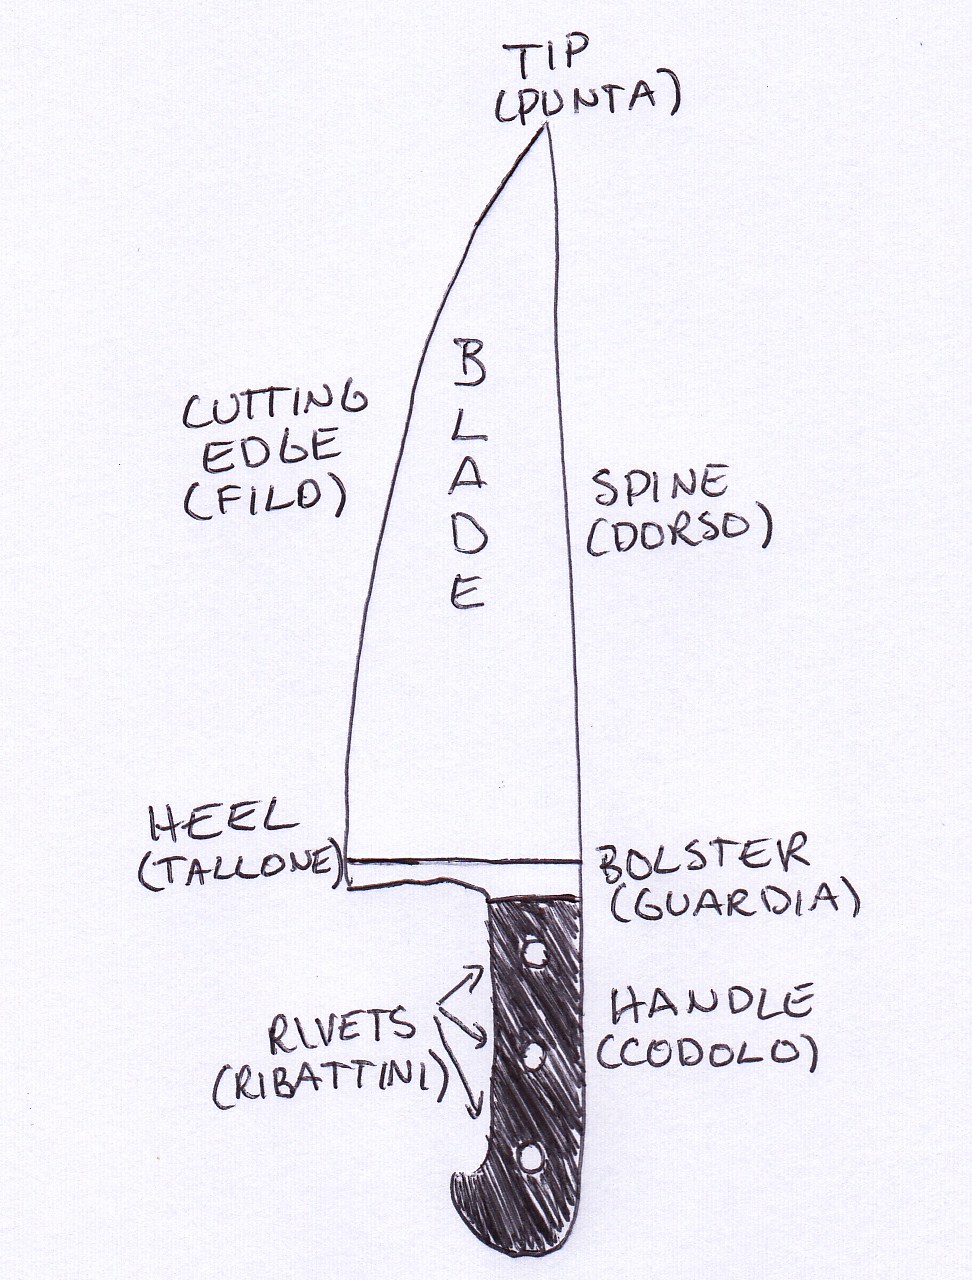
Knife Anatomy
Knife Blades
There are two kinds: forged (hammered) or stamped (cut from a flat sheet of metal). Traditionally forged blades are of higher quality and more expensive, but some well-made stamped blades are good value for money. In forged knives, the metal from the blade runs all the way through the handle (this is known as the tang). This is particularly important if you have something heavy to cut as it gives you additional leverage and stability. The tang is usually secured to the handle by rivets, but some modern designs mould the handle around the tang. Forged knives also have a bolster, a thick section of metal between blade and handle which will keep your hand from slipping forward from the handle onto the blade.
The Edge
Blades have two kinds of edges, straight (a machine ground straight or gently arced line which tapers and can be sharpened) or serrated (a hollow-ground blade punched in at the cutting edge to create a scalloped cutting edge). To use straight-edge blades you push down through the food while serrated edges draw across the food to cut like a saw. For machine-ground edges, you want a blade forged from a single sheet of metal and ground from the spine to the tip of the blade in a taper so there is no apparent change in graduation. For hollow-ground, serrated blades, two sheets of metal are combined and then bevelled. The type of edge you choose will be determined by the task you wish to undertake. Note: serrated knives cannot be sharpened in the normal way. See the following section on knife types.
Handle
Handles on high-quality knives are close-grained hard wood, plastic, or plastic-impregnated wood. The hard wood will not split or warp and has a slight texture which helps with the grip. Rosewood is preferred because it is not just hard but has a close grain that keeps it from splitting. Plastic impregnation lends strength to the wood, protecting it from moisture and detergents. Some new knives have hollow metal handles that are integrated with the blade. These are often very well balanced and have textured grips so your hand doesn’t slip. Ceramic knives often have plastic handles. You want a handle that fits well in your hand and that you can manoeuvre easily. The end of the handle should have a down-turned curve at the end to prevent your hand from slipping. Because everyone has different preferences about the way a knife handle feels in their hand, it is essential to buy knives in a shop, where you can try holding them as you would when using.
Balance
This is an essential factor to consider when selecting a knife. The balance should be evenly distributed between the handle and the blade. You can test this by holding the knife sideways 10 cm above a cutting board, with your index finger under the bolster at right angles to the knife. A perfectly balanced knife will not fall off your finger. If the knife tips one way or the other, the balance is off. Be careful doing this!
How to use and care for knives
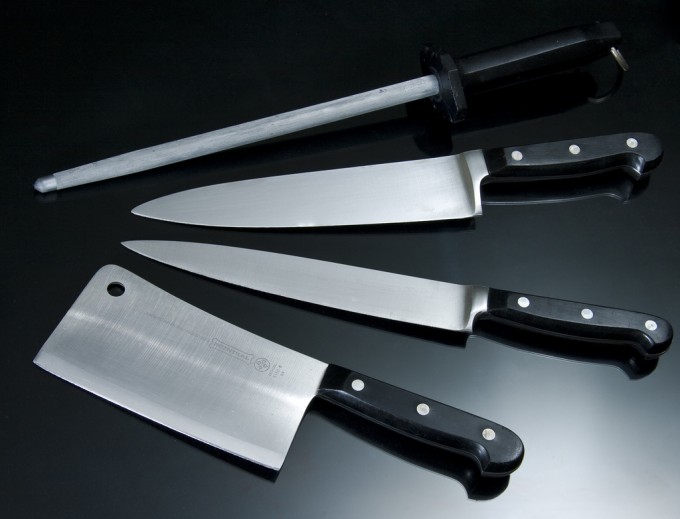
Knives need to be handled carefully for your and their safety. Good quality knives are expensive, and the blades are often very thin. This means they should not be used for cutting through bone or they may be damaged. Heavy Chinese-style cleavers can be used for this purpose. Keep your knives as sharp as possible so they perform better. This also reduces the risk of an accident, because you don’t need to use as much force when chopping or slicing and therefore the blade is less likely to slip and cut you. I sharpen my straight-edged knives on a stone before every use and, when necessary, send them to a trusted professional sharpener. Knives should be kept clean and dry and should not be put into the dishwasher. Only use your knife on a wooden or plastic cutting board as other surfaces will damage the blade. Store your knives properly so that they don’t knock against each other and get damaged. They can be hung on a magnetic strip, stored in a knife rack, or kept in a knife wallet. Never store them in a drawer.
KNIVES
ESSENTIAL KNIVES
Chef’s knife/Cook’s knife (Trinciante/Coltello da cuoco)

![]()
Best for: Almost everything: cutting, chopping, slicing, mincing, dicing, etc.
How to buy: These range in length from 20 to 30 cm. Choose whichever you feel the most comfortable using. I have both the 25 cm and the 30 cm chef’s knives and only use the 30 cm chef’s knife for cutting very large melons and pumpkins.
Why buy one? Precision cutting of both vegetables and meat is easiest with a chef’s knife. Mincing is much easier due to the curved blade. If I could only have three knives, they would be a 25 cm chef’s knife, a 10 cm paring knife, and a long, serrated bread knife.
How to use: For slicing, place your left hand on the food with the tips of your fingers touching the food and your five knuckles curled over the fingertips. Rest the side of the blade against your knuckles and the tip of the blade on the cutting board. Gently slice using the knuckles of your left hand to guide the blade and determine the width of the cut. The tip of the knife on the board should provide stability so your knife doesn’t wobble. For mincing, place the flat palm of your left hand on top of the spine of the knife with the tip of the knife touching the board. Rock the blade back and forth across the food with the spine knocking against your palm to give it resistance and the tip of the blade remaining on the board to give it stability. Note: reverse all these instructions if you are left-handed!
Paring knife (Coltello da dispensa/Spelucchino)

Best for: Paring, trimming, peeling, and slicing fruit and vegetables. Good for sectioning citrus fruit, hulling strawberries, scraping vanilla beans, deveining prawns, coring fruit, cleaning artichokes, and trimming meat.
How to buy: These have a short, rigid blade ranging between around 10 and 15 cm in length. Mine is 9 cm long and it works well for a variety of tasks.
Why buy one? A paring knife gives you more control than larger knives. Look for a well-balanced paring knife with a sharp tip, compact length, and comfortable handle. If I could only have three knives, it would be a 25 cm chef’s knife, a 10 cm paring knife, and a long serrated bread knife.
How to use: Hold the food stable on the cutting board with your left hand and slice the food with the paring knife in your right hand.
Serrated slicer/Bread knife (Coltello da pane/Coltello a lama ondulata/Coltello seghettato)

![]()
Best for: Bread and cakes.
How to buy: Look for long blades with a rounded tip. The blade may be flexible or rigid and should have a bevelled edge. Look for a slightly flexible 25-30 cm blade that has uniformly spaced serrations of moderate size.
Why buy one? You need at least one serrated knife in the kitchen for slicing bread or cake. Cutting these with a flat blade will crush rather than slice them. If I could only have three knives, they would be a 25 cm chef’s knife, a 10 cm paring knife, and a long serrated bread knife.
How to use: Place the blade on the food and draw the blade across the food in a sawing motion to cut.
SPECIALITY KNIVES
Boning knife (Scortichino)

![]()
Flexible Boning Knife

![]()
Filleting Knife
Best for: Deboning raw meat.
How to buy: The blade should be thin, highly tapered to the tip, and about 15 cm long. The blade is usually fairly rigid but you can select one that is slightly more flexible, which I prefer. The degree of flexibility is both a matter of preference and dependent on what you normally use the knife for: larger joints normally require a more rigid knife.
Why buy one? Western cooking often requires the separation of meat from bone and trimming the bones in a presentable manner. This can only be done easily with a boning knife.
How to use: Use the tip of the blade to lightly cut through meat and sinew using several small movements to trim the meat as required.
Carving knife (Cotello da macellaio)

![]()
Best for: Carving meat.
How to buy: This knife is long and relatively thin, with a tapered or, occasionally, rounded tip. A tapered tip is easier for cutting around bones but may get caught when slicing. Buy one with as long a blade as you think you can comfortably manage. Those that have a Granton Edge (scalloped sides to the blade to achieve a thinner edge) are very good. A slightly flexible blade will make carving thin slices easier. Look for one which gives you a great deal of control so you will be able to cut in awkward areas. The handle should be comfortable to hold and grip well so you don’t slip. There should ideally be a full tang and a bolster to keep your hand from slipping. Some extremely expensive decorative carving knives come with the matching carving fork. These are intended for impressing guests when you serve roasted meat. They can be very attractive, but remember that a carving knife is a tool, and function is far more important than form in this case.
Why buy one? You can carve a joint of meat with a chef’s knife and a paring knife but it’s more difficult.
How to use: Depends on the meat, but generally you place your carving fork in the meat to stabilise it and slice with the carving knife.
Fish slicer/Filleting knife (Coltello sfiletattore/Coltello per carpaccio)

Best for: Filleting fish, thinly slicing raw beef and fish for carpaccio, slicing smoked salmon, slicing cold cuts.
How to buy: A fish slicer has a narrow, flexible blade about 15 cm long, a fluted edge, and a rounded tip. It should be of sturdy construction.
Why buy one? It is really difficult to get very thin slices or to skin a fish fillet without this knife.
How to use: For slicing, hold onto the meat and make thin cuts with the knife. For skinning fish, make a cut down at the tail of the fish fillet through the meat but not through the skin. Then hold onto the end of the skin, turn your knife at a 45-degree angle with the blade against the skin, and scrape it down the skin away from your body while holding on to the tail end.
Serrated knife, small/Tomato knife/Citrus knife (Tagliamino)

![]()
Best for: Slicing tomatoes, peppers, cucumbers, lemons, and oranges – anything with a tough skin so that it cuts without bruising, squashing, or juicing the food.
How to buy: Look for a 15-18 cm blade which is slightly flexible and has uniformly spaced serrations of moderate size which give you the right amount of grip. These blades can be curved or straight, offset or straight, and have a pointed, rounded, or pronged tip. I prefer a straight blade and don’t mind about the tip.
Why buy one? They are excellent for cutting smaller things requiring a serrated blade, like thinly slicing lemons or tomatoes. You can also do this with an extra-sharp straight blade or your long serrated knife, but the small serrated knife is probably faster and gives you more control.
How to use: Hold the food firmly and draw the blade across the food.
ESSENTIAL HAND TOOLS
Scissors/Kitchen shears (Trinciante/Cesoie/Forbici da cucina)

![]()
Best for: Too numerous to mention, including cutting chicken, trimming dough, cutting up food for small children, cleaning fish, cutting baking paper, cutting kitchen twine, and snipping chives.
How to buy: Look for scissors with handles that fit comfortably in your hand and fit three to four fingers inside. The handles should not slip, and should be easy to open and close. Ensure that the blades are very sharp and long enough for the tasks required – the scissors should open wide enough for cutting a chicken. They should feel balanced in your hand and should be easy to clean; some come apart for easy cleaning, but make sure that these are stable to operate and don’t loosen over time. You can adjust the tension on some. Look for blades made from high-carbon steel or stainless steel. Some scissors have tiny serrations on the blade to give them more grip.
Why buy one? I have many pairs of kitchen shears as I use them many times while preparing a meal. You don’t want to dull your knives on paper and twine. Scissors are much faster and give you more control than a knife in some preparations.
How to use: Put your fingers through the wider loop of the handle, your thumb through the smaller loop of the handle, pull your fingers and your thumb away from each other to open the scissors, place the item to be cut perpendicular to the blades in between the blades, and bring your fingers and thumb together to close the blades.
Steel (Acciarino/Acciaiolo/Affilacoltelli)

![]()
Best for: Maintaining a proper edge on a knife blade so that the knife retains its sharpness.
How to buy: These are long steel, glass, ceramic, or diamond-impregnated sticks. They come in coarse, medium, and fine grain and can be either round or flat in section. They range in length from 7.5 cm to around 35 cm. The length you need will be determined by the length of the blades you need to sharpen, but in general terms the longer ones are more versatile. They usually have three parts: the sharpening stick for drawing the knife across, a guard to ensure that you don’t hurt yourself, and a handle, often with a ring for hanging the steel for storage. Some do not have a guard and must be used with even greater care. I have a round steel one about 35cm long that I am very happy with.
Why buy one? If you buy good knives, a steel – or other professional knife-sharpening tool – is essential to keep them working properly. Your knives will last longer if you use one regularly, and a sharp knife is safer to use than a dull knife.
How to use: Hold the steel vertically or put the tip on a cutting board and draw the knife along the steel ensuring you draw along the entire length of the blade. Using even pressure and a light touch, draw the steel once along on one side of the blade, and once on the other side of the blade. Repeat three times. If you hear a ringing tone, you are pressing too hard. Use the steel every time you use your knives.
Peeler (Pelapatate)

![]()
Straight swivel peeler

![]()
‘Y’’-shaped peeler
Best for: Peeling vegetables and fruit and shaving chocolate and cheese.
How to buy: These come in two types. One is straight and thin, and the blade runs in a straight line from the handle which is particularly good for peeling fruit. The other is the ‘Y’’-shaped peeler, in which the blade is perpendicular to the handle. I much prefer the ‘Y’-shaped peeler because food doesn’t tend to get stuck in it as it does with straight peelers. Peeler handles can be metal or plastic and have a blade which is metal or ceramic. A peeler should be comfortable to hold, lightweight and sharp, and have a swivel blade to follow the contours of the food. I buy plastic peelers and replace them when the blade is dull as they cannot be sharpened.
Why buy one? Peeling with a knife takes ages and cuts too thickly. A peeler really saves time.
How to use: Draw the peeler across the food.
SPECIALTY HAND TOOLS
Carving fork (Forchettone)

![]()
Best for: Carving meat, testing the doneness of braised meat or vegetables, or transferring joints.
How to buy: Carving forks can have straight or curved prongs. I prefer the curved fork, which I find easier to manoeuvre. Look for handles that are easily gripped and have solid prongs. Make sure the handle fits comfortably in your hand and does not feel slippery. Tine lengths range from 10-25 cm. Find a length that feels comfortable to you and think about how large the joints of meat are that you will be carving. Some carving forks come in sets with the carving knife, a decorative touch when you are entertaining guests.
Why buy one? You will need something to hold a hot, large joint of meat in place while you carve. This fork will ensure that the meat does not slip while carving, causing injury and frustration. An ordinary table fork can be used instead, but it is not nearly as effective at holding the meat in place and more likely to cause slipping.
How to use: Stick the meat with the prongs of the fork and hold onto the handle to stabilise the meat while you carve with the knife.
Pastry Cutters (Taglia pasta, Stampini per biscotti)

![]()
Best for: Cutting gnocchi alla romana, biscuits, etc.
How to buy: These come in a variety of graduated sizes and fit into a single container for easy storage. The top edge should be rolled and the bottom edge sharp for cutting. Cutters are typically made out of tin, stainless steel, or plastic and come in many shapes.
Why buy one? The cutters cut perfectly thanks to their sharp edge. You can also use cups or glasses but it is more difficult to dislodge the dough if it sticks.
How to use: Just place the cutter over the dough, press, pick up, and push the cut dough out onto your work surface.
Larding needle (Lardatoio)

![]()
Best for: Inserting fat into meats for roasting or braising.
How to buy: This is a long metal half-cylinder with a sharp point, ideally about 35 cm long and made from stainless steel.
Why buy one? Larding needles are the only tools that enable you to get a strip of fat deep into a large joint of meat, to provide juiciness in the finished dish. You can prick the outside of the meat with a skewer or small knife and stuff the fat in that way, but it is not as effective because it can’t penetrate very far into the meat and your meat will not be as juicy.
How to Use: Place the lard inside the needle, thread the needle lengthwise into the meat, use your finger to hold the lard in place, and remove the needle.
Mandoline (Tagliavedure a mandolino/Mandolino)

![]()
Best for: Slicing crisp vegetables and fruit to a uniform thickness, in slices or julienne. Some models can also create gauffrettes and batonnets.
How to buy: Mandolines are made using an all-metal construction or a combination of metal or ceramic (especially for the blades) and plastic. Ensure that the mandoline is very stable and has feet that grip the cutting board: this provides stability – slicing yourself on the mandoline is not fun. Make sure it has a large knuckle guard which fits well with the mandoline. I had one which was not well designed and when you got to the end of a carrot it would leave quite a lot at the end because the knuckle guard would hit the raised edges of the mandoline. I don’t like flat knuckle guards as they are difficult to hold; the knob-shaped ones are easier. The blades can be straight, slanted, or V-shaped and are made from stainless steel or high carbon steel (the better choice). They need to be razor-sharp. Some mandolines have adjustable screws for changing the thickness of the cut; others have plates which turn over so you have just two thicknesses. Some mandolines come with several interchangeable blades. Make sure the blades – particularly for doing julienne cuts – have strong teeth that do not bend when cutting hard vegetables like carrots. Finally, some mandolines fold flat which is handy for storing in drawers but ensure this feature does not come at the expense of stability.
Why buy one? I love the mandoline. There are recipes I would not consider without it as it makes short work of tedious cutting such as shredding the vegetables for zhajiangmian. It is a small luxury to have one, however, as I could just cut everything myself with my chef’s knife.
How to use: Attach the blade and adjust it to the desired thickness. Place the food against the mandoline, place the knuckle guard on the food, and start drawing the food back and forth against the blade until it has been completely sliced.
Mezzaluna

![]()
Best for: Finely chopping herbs, garlic, vegetables, and meat.
How to buy: The mezzaluna consists of one or two curved blades with two handles made out of wood, metal, or plastic. The blades are usually 25 cm long. Sometimes the mezzaluna – which means half-moon – are sold together with a curved cutting board into which the blades fit neatly.
Why buy one? Many people regard this as an easy way of finely chopping food. I have one but rarely use it as I prefer chopping with my chef’s knife. This is a matter of personal preference. If you know someone who owns one, try using theirs before buying so you can decide whether you would use it.
How to use: Place the food on the board, hold the mezzaluna by the handles with both hands, place it on top of the food, and rock back and forth.
Pastry wheel/Pasta wheel (Rotella tagliapasta)

![]()
Pastry wheel

![]()
Flexible frame with several pastry wheels
Best for: Cutting pasta and pastry.
How to buy: Pastry wheels consist of a small handle, made of metal, wood or plastic with a wheel-shaped blade that rotates when rolled on a flat surface. The blade’s edge can be straight or zig-zagged. The handle should be comfortable and the blade should be sharp. Some come with several cutting wheels on a flexible frame which is adjustable in width so you can simultaneously cut more pasta the same width.
Why buy one? You can just use a paring knife, but the zig-zag feature is more decorative.
How to use: Place the pastry or pasta on the work surface, place your wheel on top and press down to roll across.
Pizza cutter (Rotella tagliapizza)

![]()
Best for: Slicing pizza without disturbing the toppings.
How to buy: These are similar in design to pastry wheels, but the wheel is usually larger. They come with plastic or metal wheels. I prefer metal for durability but the plastic is good if cutting on non-stick surfaces. It should have a comfortable handle and a finger guard. The blade should be razor sharp.
Why buy one? You can use a knife but the cheese tends to stick to it and so the toppings get dragged around.
How to use: Place the blade at the crust end of the pizza, push down and across the pizza.
Ravioli cutter/Ravioli stamp/Ravioli press (Stampo per ravioli)

![]()
Round ravioli cutter

Square ravioli cutter![]()
Best for: Cutting out stuffed pasta.
How to buy: These have a square or round metal scallop-edged cutter with a wooden handle for stamping individual pastas.
Why buy one? You don’t necessarily need one: you can also fold the pasta yourself and cut with a knife, zig-zag cutter or cup. But a press ensures that the pasta cushions are uniform in size and shape.
How to use: Place a sheet of pasta on the work surface, place mounds of filling on top, top with another sheet of pasta, press around the filling to eliminate any air, and place the stamp over the filling to create individual ravioli.
Truffle slicer (Affettatartufi)

![]()
Best for: Finely slicing white and black truffles and firm mushrooms.
How to buy: Truffle slicers have a steel blade mounted in a small wood or steel frame. They often have a screw for regulating the thickness of the slices.
Why buy one? You could use a mandoline with a fine setting but it’s difficult to shave the truffles directly over food without risk of injury. Black truffles can also be grated.
How to use: Rotate the screw to the thickness desired. Hold the truffle shaver over the food and draw the truffle back and forth across the blade.
GRATERS
Cheese grater (Grattugia formaggio)

![]()
Barrel grater

Box grater![]()
Best for: Grating cheese, particularly Parmigiano-Reggiano, Grana Padano, pecorino and other hard cheeses.
How to buy:
Barrel Graters: These come in plastic or metal, with metal grating surfaces. I prefer plastic because mine lives in the refrigerator with the cheese and gets used daily – I like plastic that isn’t cold to the touch. Look for models with a large barrel so it can grate faster, and a comfortable handle that is easy to squeeze, disassemble and clean. Some have interchangeable barrels with perforations of different sizes.
Box Graters: These are round or rectangular boxes with a grater as the lid so the cheese falls in when grated. The cheese is removed by pulling open the drawer.
Why buy one? If you have a general grater then you don’t need a separate cheese grater. However, if you grate cheese all the time, as we do at my house, it is much more convenient to have one just for this job.
How to use: For the rotary graters just place a chunk of cheese the appropriate size into the hopper, close the top, and squeeze in place while you crank the handle to grate cheese onto the food. For the box graters, draw the cheese up and down across the grate and then collect the cheese from the box.
Grater (Grattugia)

![]()
Flat grater

![]()
Microplane rectangular grater

![]()
Box grater with blade top
Best for: Grating cheese, ginger, bread, fruit and vegetables; zesting citrus fruit.
How to buy: These can either be flat with a blade and handle, be rectangular or triangular with multiple blades,or have a blade built in as the top of a box. The benefit of the multiple-blade design is that it offers three to four different types of grating, generally medium, fine, rasp, and slicing. The boxes can contain the food after it is grated and sometimes come with a cover for the bottom to retain the food. The drawback of the box style is that you risk grating your knuckles. Look for a stainless steel grater with enough surface area to comfortably grate a potato. It should be well balanced, have feet which keep it stable so it doesn’t move around, and have comfortable handles to hold it in place. Graters are usually made of metal, either stainless steel or tin. The classic type of grater has holes stamped out so the grating edge is thicker. The newer Microplane grater has teeth which jut out parallel to the metal frame. They are thinner, and excellent for grating hard cheeses like Parmigiano-Reggiano, nutmeg, and citrus zest. I have a box grater for vegetables, fruit, and softer cheeses, and a Microplane for citrus zest, chocolate, nutmeg, hard cheeses, and ginger.
Why buy one? Grated ingredients have different textures from chopped.
How to use: Draw the food down across the grater so the teeth catch the food. Be careful not to grate your knuckles. The medium grater is good for soft cheese, vegetables, and fruit, the fine grater is good for harder cheeses and chocolate, the rasp is good for citrus zest and nutmeg, and the slicer is good for softer cheeses.
Nutmeg grater (Grattugia per noce moscata)

![]()
Nutmeg rasp grater

![]()
Spring action nutmeg grinder

![]()
Knuckle guard attachment for microplane grater
Best for: Grating nutmeg; creating texture on the back of gnocchi.
How to buy: Some are flat boards with a rasp grater. Others are mills with a spring action which pushes the nutmeg against the blade as you churn. And there are now Microplane style flat boards with knuckle guards. Buy one which is comfortable to use and you are less likely to hurt yourself.
Why buy one? I prefer to use my Microplane for nutmeg.
How to use: For the mill and the Microplane style, you pop the nutmeg in, close it, and then either churn (mill) or draw the knuckle guard back and forth across the blade (Microplane). For the rasp grater, hold the nutmeg firmly and draw it back and forth across the blade with your hand.
CORERS
Apple corer (Levatorsoli)

![]()
Best for: Coring apples and pears.
How to buy: Look for corers with longer barrels of a wider diameter so you only have to cut in once to remove the core. They are normally made out of stainless steel and may have a plastic or rubber handle. The bottom of the barrel should be razor sharp, and can be either straight or serrated with zig-zag cutting teeth. Try the handle for comfort before buying.
Why buy one? I only use this if I need a whole apple or pear for a dish, which is very rarely. But if you make dishes using whole fruit, this is very useful.
How to use: Stand the fruit, stem-side up, on a cutting board, Place the cutting end of the tool over the stem and push the barrel down through the centre of the fruit until it touches the cutting board. Discard the core.
Cherry stoner (Snocciolatore)

![]()
Best for: Removing the pit from cherries, plums, or olives.
How to buy: They come in stainless steel or plastic. Look for a model which pits several cherries at onece to save time. Look for models that don’t spray juice, keep the fruit intact, don’t jam, neatly retain the pit, and are easy to clean.
Why buy one? It saves time if you need to pit a lot of cherries or olives and will help keep your kitchen clean.
How to use: Place the cherries in the pitter, close, remove the cherries, and add the next batch.
Melon baller (Scavino)

![]()
Best for: For forming balls of vegetables or fruit; for scooping out the seeds of pumpkins, squash, zucchini (courgettes), pears, apples, and cucumbers; and removing the choke of whole artichokes.
How to buy: Melon ballers have a plastic or metal handle, and either have the cutting scoop on one or both ends, in different sizes. The sizes are usually 17 mm and 22 mm. The scoops should be firmly attached to the handle and be sharp. The handle should fit comfortably in your hand.
Why buy one? Fun for creating decorative balls, and for cutting out the chokes of artichokes.
How to use: For forming balls, push the scoop into the fruit and spin it around to form a ball. To de-seed, scrape along the seeds to remove. To remove the central spiny part from artichokes, peel the outer leaves from the artichoke; open the central leaves, scoop out the choke with the small melon baller and discard.
GRINDERS
Pepper grinder/Pepper mill (Macinapepe)

![]()
Best for: Freshly grinding black pepper.
How to buy: Pepper mills come in many varieties: tall or short; battery-powered or hand-cranked; in plastic, wood, or metal; with internal grinding mechanisms made of ceramic, plastic, or steel. Some of these are made for entertaining and can be extremely beautiful (and expensive!). Look for pepper grinders that fit into your hand well, grind easily, fill easily, and are durable; you should also be able to alter the size of the grind from coarse to fine. I prefer a steel mechanism. You can even buy disposable pepper mills with the black pepper corns inside.
Why buy one? I think it is absolutely essential for Western cooking. Pre-ground black pepper tastes like sawdust because pepper loses its volatile oils quickly after being ground.
How to use: Turn the top or the handle or push the button to grind the pepper.
MASHERS, POUNDERS, AND PURÉERS
Cutlet bat (Batticarne)

![]()
Cutlet bat/mallet

Cutlet bat
Best for: Pounding meat thinly, crushing nuts, etc.
How to buy: Cutlet bats can look like a mallet with a long straight handle or have a shorter handle with a flat round disc on the end. The long-handled bat is used like a hammer, held horizontally over the work surface, while the shorter-handled bat is held vertically in the fist and smashed downwards onto the meat. The long-handled bat can also have a round or square surface to the bat-head, and some have both a flat side and a spiked side for tenderizing meat. I prefer the short- handled version. The bigger the surface area of the disc or head the better, and heavier bats make it easier to pound the meat thinly. Bats are typically made out of stainless steel and may have a rubber or stainless steel handle. The handle should be comfortable and not slippery.
Why buy one? You can just use the side of a cleaver but if you often flatten meat for escalopes etc., this is a worthwhile investment.
How to use: I normally cut the meat across the grain, place the meat between two pieces of cooking paper, and start whacking it with the bat. Be careful to get the surface even and not to break the meat.
Food mill (Passaverdura/Mouli)

Best for: Puréeing soft food such as tomatoes, soups, fruit, etc.
How to buy: A food mill should have a bowl with a hand crank attached to a flat blade, either curved or conical, which is rotated over a disk. Look for food mills which are well constructed, fit firmly on top of the pan or bowl that will hold the purée, be easy to clean, and easy to turn. It should come with interchangeable disks with different-sized perforations between 1 and 3 mm to alter the thickness of the purée, and these discs should be easy to change. They come in plastic and stainless steel. I prefer stainless steel for durability and a 40 cm diameter bowl.
Why buy one? The food mill removes hard parts such as seeds, skins, lumps, fibres, and bones from the pulp rather than chopping them up. You can just use a blender or a food processor but the texture will be different and neither machine can completely remove skins and seeds.
How to use: Place the food mill on top of the pot or bowl, place the food in the bowl of the food mill, and turn the crank.
Masher (Schiacciapatate)

![]()
Best for: Mashing potatoes, tomatoes, root vegetables, cooked apples, and any other soft foods that need mashing.
How to buy: These come with a perforated plate or a wavy wire; some have a second wire which can be pushed down to mash faster. Look for one with a comfortable handle which is long enough that you can mash in a pot without burning your hands. The best are made of metal.
Why buy one? It’s faster and more uniform than mashing with a spoon and it makes it easier to get rid of lumps.
How to use: Push the masher down on the food and repeat until evenly mashed.
Mortar (Mortaio) and Pestle (Pestello)

Marble mortar with wooden pestle

![]()
Granite mortar and pestle
Best for: Grinding nuts, herbs, garlic, spices, saffron, chilli, and making sauces and pastes like pesto, marinades, etc.
How to buy: Look for mortars that have a bowl capacity of at least 700 ml, as the mortar should be only filled half way when used; the pestle should be long and heavy so that your hand does not come in contact with the bowl. Mortars are generally made from stone, ceramic or even bronze, and pestles are made from stone, glass, ceramic, marble, metal, or wood. Italians traditionally use a marble mortar with an olive-wood or marble pestle. The wooden pestle is good for crystals like sugar and salt but not for herbs as the wood absorbs the herbs’ flavour. Marble is also porous and will be stained by ingredients like saffron. I prefer to use a heavier stone mortar with a matching pestle as the texture of the stone facilitates the grinding. Be careful that the texture is not so coarse that food gets trapped in it (like some Mexican volcanic stone mortars). Mortars should be stable and not move around the countertop when used.
Why buy one? You can finely chop or blitz foods in the food processor or hand-held blender but the texture is not the same.
How to use: Place the food in the mortar and begin grinding with the pestle as specified in the recipe. Don’t fill the mortar more than halfway so that when you grind, the food doesn’t splatter or spill. Generally, the food is ground rather than pounded.
Potato ricer (Schiacciapatate)

![]()
Best for: Breaking down cooked potatoes, vegetables, chestnuts, and fruit. It is particularly helpful for making potato gnocchi as the potatoes come out light, dry, and fluffy.
How to buy: Ricers can be made from plastic or chromed steel. I prefer metal for durability. They should have a comfortable handle which does not get hot and is easy to squeeze closed, and should have a decent-sized hopper. Ricers come with fine and coarse discs or a dial to change the size. The more perforations in the disk the better. Some come with a pot hook to ensure stability. Look for models that are easy to clean and dishwasher-safe.
Why buy one? Ricers ensure that the potatoes are uniformly puréed and lump-free, producing fluffy not gluey potatoes. This tool is essential for making potato gnocchi.
How to use: Place the cooked potato in the compartment, line up the pusher, and squeeze to extrude the potato.


Leave a Reply